How to Create a Stunning Disney Gallery Wall with Your Collectibles

A Disney gallery wall transforms scattered figurines, pins, and art into a cohesive display that turns any room into a personal showcase. This guide covers layout planning, framing techniques, lighting choices, and the specific products that make mounting collectibles safe and stylish. Whether the collection spans decades or just started growing, these steps help create a display that's organized, protected, and genuinely impressive.
What Do You Need to Build a Disney Gallery Wall?
You'll need three categories of supplies: display hardware, protective materials, and lighting. The specific items depend on what's being showcased—pins require different solutions than framed cels or vinyl figures.
Here's a breakdown of the core components:
| Category | Recommended Products | Best For |
|---|---|---|
| Wall Mounting | Command Picture Hanging Strips, OOK Professional Picture Hangers, IKEA MOSSLANDA Picture Ledges | Light to medium frames, seasonal rearranging |
| Pin Display | Cork board tiles, felt pin banners, acrylic pin cases from Michael's | Disney Trading Pins, Fantasy Pins |
| Figure Protection | Acrylic display cases (ClearCase, Sideshow Collectibles), floating shelves | Funko Pops, Jim Shore figures, LEGO sets |
| Lighting | Philips Hue Lightstrips, IKEA MITTLED spotlights, battery puck lights | Accent lighting, glass case illumination |
| Framing | Michael's Custom Framing, Framebridge, IKEA RIBBA frames | Poster art, limited edition prints, Park maps |
For heavier items—think large framed Snow White production cels or limited edition Haunted Mansion stretching portrait replicas—traditional wall anchors beat adhesive strips every time. A 24x36 frame filled with glass and matting can weigh 8-10 pounds. That's beyond what sticky backing can handle long-term.
The Victoria-area collectors Lina connects with often source supplies from Michael's for framing basics and IKEA for modular shelving. Both offer enough variety to match different aesthetic directions without requiring custom carpentry.
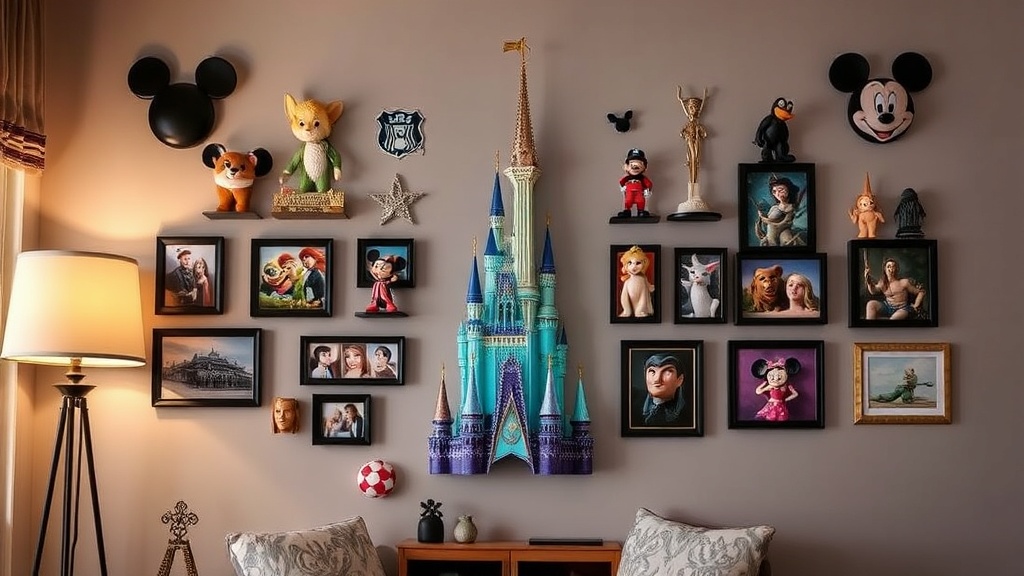
How Should You Arrange Disney Collectibles on a Wall?
Start with a focal point and build outward. The largest or most visually striking piece anchors the arrangement—everything else supports or complements it.
Three layout approaches work particularly well for Disney collections:
The Grid. Symmetrical rows and columns create a gallery-museum feel. This suits framed posters, pin boards arranged in identical sizes, or rows of matching acrylic cases. Measure twice. Mark lightly with pencil. Step back frequently.
The Salon Style. Overlapping frames and varied heights create energy. This approach works when mixing item types—perhaps a Lion King framed print above a floating shelf with Jim Shore figurines, beside a pin board with vintage 1980s cast member exclusives. The trick? Maintain consistent spacing between pieces (2-3 inches) even when heights vary.
The Themed Zone. Group by film, park, or color story. A "Tomorrowland corner" might feature Space Mountain blueprints, a limited edition pins set from the 50th Anniversary, and a retro rocket model. The visual thread ties unrelated items together.
Before driving a single nail, lay everything on the floor. Rearrange. Take photos. Sleep on it. Wall holes are permanent—floor layouts aren't.
Spacing and Height Guidelines
Gallery walls typically look best when centered at eye level—approximately 57-60 inches from floor to the center of the main piece. In rooms where people mostly sit (living rooms, bedrooms), lower that to 48-54 inches.
Spacing between frames should stay consistent. Two inches is standard. Four inches creates breathing room for larger pieces. Anything wider starts to look disconnected rather than curated.
What's the Best Way to Display Disney Pins?
Pin collectors face a specific challenge: hundreds (sometimes thousands) of small items that need visibility without looking cluttered. The solution depends on whether pins are meant for trading or permanent display.
For traders who rotate inventory frequently, cork tiles work well. They're inexpensive, replaceable when damaged, and allow easy rearrangement. Available at most office supply stores and craft retailers, a pack of six 12x12 tiles covers significant wall space for under $20.
For permanent collections—graded pins, cast member exclusives, or complete limited edition sets—acrylic pin cases offer protection from dust and handling. Companies like Sideshow Collectibles and specialty Disney pin retailers sell cases with velvet backing and UV-protective acrylic fronts. Worth the investment for pins valued over $50 each.
Felt banners with printed Disney character art provide middle-ground flexibility. They look intentional (decor, not craft project) while allowing pins to move as collections grow. Available through shopDisney and independent sellers on Etsy.
One note on pin backing: Rubber Mickey-shaped backs look cute but degrade over 3-5 years. For wall displays that stay put, replace them with locking pin backs. The small metal clasps prevent loss and keep pins sitting flat against the display surface.
How Do You Light a Disney Gallery Wall Properly?
Poor lighting ruins even the most thoughtful arrangements. Shadows hide details. Glare obscures artwork. The right lighting makes colors pop and draws the eye exactly where intended.
Avoid overhead lighting alone. Ceiling fixtures cast shadows downward, creating dark zones at the top of frames and making shelves look dim. Layer instead.
Picture lights mounted above individual frames work for statement pieces—a framed Steamboat Willie production drawing deserves this treatment. Battery-operated LED picture lights (about $25-40 at hardware stores) install without wiring and run for months on a charge.
For larger installations, LED strip lighting tucked behind floating shelves or along the top of a gallery arrangement creates ambient glow. Philips Hue Play light bars, positioned on shelves aiming upward, wash walls with adjustable color. Set them to warm white (2700K) for traditional gallery feel, or soft purple for a Haunted Mansion vibe.
Acrylic display cases with built-in lighting exist but often cost $200+. A budget alternative: small battery puck lights stuck to the inside top of standard cases. Check them monthly—battery replacement prevents flickering that cheapens the display.
How Do You Protect Collectibles on Display?
Dust, UV light, and humidity damage collectibles over time. A gallery wall should showcase items—not slowly destroy them.
UV protection matters. South-facing windows pour concentrated sunlight onto walls for hours daily. Even indirect light fades prints and discolors figurines over years. Solutions include:
- UV-filtering glass in frames (request it at Michael's or Framebridge)
- UV-protective spray film applied to windows
- Rotating displayed items every 3-4 months, storing alternates in darkness
That last point deserves emphasis. The serious collectors Lina knows rotate their galleries seasonally. It keeps rooms fresh and prevents any single item from taking light damage. Store off-rotation pieces in acid-free boxes inside closets—NOT attics or basements where temperature swings and moisture create mold risks.
Dust management. Weekly feather-dusting prevents buildup. Monthly, use a can of compressed air (the kind sold for computer keyboards) to clear dust from figure crevices and pin surfaces. Never use cleaning sprays on painted collectibles—moisture seeps into seams and causes bubbling.
For high-humidity climates (coastal areas, basements), silica gel packets inside display cases absorb moisture. Replace them every 6 months. Small humidity monitors ($10 on Amazon) track levels inside enclosed cases—keep readings under 50% relative humidity.
What About Mixing Disney Styles and Eras?
A gallery wall gains character from variety. A 1950s Cinderella movie poster alongside a contemporary Encanto figurine collection tells a story about Disney's evolution—and the collector's personal journey.
That said, visual chaos undermines impact. Unify mixed eras through framing consistency (all black frames, all wood tones) or color coordination (grouping by dominant palette—blues together, earth tones together).
One effective technique: the "timeline wall." Arrange pieces chronologically by film release date, creating a visual history of animation. Start with Steamboat Willie (1928) and progress through the Golden Age, Renaissance, and modern 3D eras. Add small brass plaques noting years—cheap on Amazon, transformative for presentation.
Vintage Park memorabilia (tickets, maps, guidebooks) pairs beautifully with contemporary pins from the same attractions. A 1971 Magic Kingdom guidebook beside a 2023 TRON Lightcycle Run pin creates conversation about how spaces change.
When to Edit
Not every collectible deserves wall space. Some items—damaged plush, mass-produced fast-food toys, duplicate pins—clutter more than they contribute. Be selective. A gallery wall with 15 exceptional pieces impresses more than one with 50 mediocre ones.
Here's the thing: rotating items off the wall doesn't diminish them. Storage preserves them for future displays. The best collectors curate ruthlessly.
Final Tips for a Polished Result
Before finishing, audit the wall from multiple angles. View from the doorway (first impression), from seated position (where time is spent), and from extreme angles (catches glare issues).
Photograph the completed arrangement. Digital documentation helps recreate layouts after moving, and proves valuable for insurance purposes. High-value collections should be scheduled on homeowner's or renter's insurance—photographs support claims.
Leave room to grow. A gallery wall crammed edge-to-edge looks finished in the wrong way. Strategic empty spaces invite future acquisitions. They also give the eye rest—an underrated element of good design.
Creating a Disney gallery wall takes planning, the right supplies, and willingness to experiment with layout before committing to holes. The result—a personalized museum celebrating characters and memories that matter—rewards the effort many times over. Start with one section. Expand as confidence (and the collection) grows.
Steps
- 1
Plan Your Layout and Theme
- 2
Choose the Right Frames and Display Cases
- 3
Arrange and Hang Your Collection